We're having a baby!
Just kidding. That's what's expected after a title of this nature though, isn't it? Sorry to disappoint. (If you're wondering, we're planning to foster/adopt a kiddo or two... someday. We'll keep you posted.)
We really do have exciting news though! So far, our clients have been friends who happened to want something awesome to wear. Which is stellar, because who doesn't like making beautiful things for people they love? We sure do. But - the big deal this week? We got our first real client - the kind that we never met before until they found us on the internet and decide to contact us so we could make them something - how great is that? (Pretty amazing. We squealed.) This is a really, really big deal for our little business.
Oh, and can I tell you what we're making for her? A 1930s-style bias cut wedding dress! Which is an amazing project to be working on. And - her dress ideas are gorgeous! We cannot wait to get started making it, and eventually share it with you. (With her permission, and I'm guessing after the Big Day, of course. So you'll have to exercise some patience on that one; her wedding's in December.)
In other news, I only have to work Monday and Tuesday at my nanny job next week, which means I have a nice long weekend to get started on this dress. And we may finally have a chunk of time to celebrate our anniversary with the fancy dinner at Chalkboard we were hoping to have at the beginning of the month. And maybe some massages. And definitely something bubbly in the toasting glasses we never used at our wedding.

Showing posts with label wedding. Show all posts
Showing posts with label wedding. Show all posts
Saturday, July 30, 2011
Monday, July 25, 2011
How to Stage Manage Your Wedding
Hey look - I'm back over at A Practical Wedding today with a post about stage managing your wedding. Go check it out! (And thanks Tim for stage managing ours!)
Hope your week is off to a good start. I'll be back in a day or two when I think of something compelling to write about...
Hope your week is off to a good start. I'll be back in a day or two when I think of something compelling to write about...
Sunday, July 24, 2011
Working for the Weekend... Again
Well, once again, it's been a busy week and weekend (so far) over here. Right this second, I am waiting for a few files to upload and then... the Crafty Broads website will be live and ready for action! I would LOVE your feedback - please email me or comment here if you have a chance to check it out.
I am SO. EXCITED. to be done making the website. Although it didn't take me long in total number of hours, it has really eaten up the last couple of weeks, and I have other projects I want to work on.
Here's the rundown of things that are in the works:
And with that, I am calling it a day.
*Julia disagrees, but squash is totally a vegetable.
I am SO. EXCITED. to be done making the website. Although it didn't take me long in total number of hours, it has really eaten up the last couple of weeks, and I have other projects I want to work on.
Here's the rundown of things that are in the works:
- Next week, we're meeting with a potential client who is looking for a custom wedding dress (very exciting, especially since she wants something 30s and bias-cut, which we adore)
- Also next week or the week after, I'll be doing a guest post on another blog (I'll link when it's up)
- I've got two big events to stage manage in August - a friend's wedding and a handful of small parties being held around the country which will kick off a major event celebrating the legalization of same-sex marriage in New York. (You can read about it here and here.) Also? Same-sex couples are getting married there RIGHT THIS MINUTE, thanks to some nice judges and government officials who kept buildings open late and came in on their days off to dispense forms and officiate nuptials. Hooray for that! (Still waiting on you, Illinois. Ahem, downstate...get with the program.)
- I'm hoping that tomorrow I'll get time to work on the pattern for a custom three-piece suit we're making, which I've been wanting to work on for way too long now.
- If I ever finish all these other obligations, I have a ton of sewing projects for myself to get started (or finished, as the case may be) on too!
And with that, I am calling it a day.
*Julia disagrees, but squash is totally a vegetable.
Tuesday, July 12, 2011
The First Anniversary is Paper.
Or so I'm told. And today, continuing our wedding DIY madness posts, I bring you: paper. (What, you thought I was going to think of something clever there? Nope.) One of the most time-consuming projects for our wedding was the paper suite and accompanying website. I spent many hours perfecting the bits and pieces that everyone would see before the big day. Not because I was worried about what they'd think so much as because I like doing that kind of stuff and I happen to be a bit of a perfectionist. Many of you likely know already that the two of us are quite fond of retro and period styles in fashion. We particularly enjoy the 1930s for the prevalence of gloriously low backs and the golden age of bias cuts. What you may not know is that this love expands into the rest of our lives when we look at things like furniture (reupholstery posts are really overdue) and architecture. Simply put, we like old stuff way better than new, at least as far as style is concerned. (If you want to talk about safety and function, I'll take my electricity grounded, my surges protected, my power tools new and bright yellow, and my staple gun pneumatic, thank you very much. But that's another story for another day.) Given that, we decided on a 1930s art deco style theme for our printed and online goods. After much hemming and hawing over fonts, countless nights tracing outlines in Illustrator, and a kinda steep learning curve for web forms, we ended up with these:
[Julia's update] The Save-the-Date design was pretty simple - we went with an image of Chicago that imitated the movie and theatre posters that would have been prevalent in the 20's and 30's, in that art deco style. We decided to go with an image of the city because it was so iconic, but also because we weren't big fans of the typical flowers and hearts that accompany most wedding announcements. That just wasn't our style. The "One Night Only" and listing of our names as starring players was more us, because so many of our friends know us as behind-the-scenes players in the theatre industry, so listing our names as top billing, like a poster or playbill, was not only a nod to our careers, but also what it might be like to attend an event where we starred for once, instead of just running the show.
The art deco style was important to our wedding because it was the style of the wedding ring that I'd found in antique store and given to Cindy when I proposed. Once we chose that style, everything else seemed to easily inform our other paper choices. The invitation design was actually inspired by one of our friends who attended and helped with the wedding. He came to a party we were having in our home once, and saw a photo of the two of us from when we'd first met. It was taken during our first getaway together, on a weekend trip to Wisconsin, where Cindy whisked me away to a bed and breakfast. It was one of those photos that you take with one hand while facing the camera, but we had given up trying to pose and managed to capture a kiss instead. He saw that photo and said that it would be the perfect Save-the Date for our wedding. I agreed, but thought it would be a better use as our invitation image. Cindy used her Illustrator skills to trace the image in that photo, and since we were going with the art deco style, we drew some long, luxurious hair onto our heads that would do dramatic things that our short hair never could have done in that photo.
We continued the motif of the Chicago skyline on the inside of the invitations, and we decided to include it on our thank you cards, too. The thank you card image was very easy, as it was one of the many stupid-grinned photos of us from the wedding, and it pretty much said all we needed to say.
Cindy put a lot of energy and many hours of work into the website. She made it not only look gorgeous, and in the same motif as the paper items, but it was also incredibly functional for all our guests. There were links to the hotel, the restaurant, maps, and to RSVP online. She even created a form for our guests to help us build our wedding playlist, buy requesting any song they felt like listening to at the reception. My favorite feature, though, was our online gift registry. We used a website that allowed us to create a registry out of any gift that you could buy online. This was helpful to us because we didn't want to be stuck only having things from a single store (we have eclectic tastes) and because the one store we would have chosen didn't have a gift registry. We chose things we found all over the internet, and our guests could purchase exactly what we wanted and have them sent directly to our home, which was pretty great. We also gave our guests the option to simply give us money online, to help us pay for our Boston wedding, and to buy us Foodie Registry gift certificates, which helped launch us into our first year of eating fabulously well, and starting our very own blog about food (and obviously, other things.)
The website was designed to match our paper goods, and you can check out all the bells and whistles at this link, if you like. Here's a screenshot/sneak peak:
 (Is it Friday yet? I feel like it should be. And that I should go to the beach... Anybody with me?)
------
Update: Julia says I'm not finished writing this post because it's clear to everyone that I just said to hell with it and ended it without really, well, having an ending. So. Here goes.
I suppose I could tell you about how this illustration on the front of our invitations was taken from a photo we took of ourselves on our first trip together way back in the summer of 2006.
We were sooooooo in love (we still are, but not in that brand new relationship way) and we skipped town for just one night, drove way up into Wisconsin, and stayed at a lovely little B&B. On the way up, we stopped at a lakefront park for a picnic on the beach, and on the way back we hiked through another state park that was full of waterfalls. We climbed onto a giant log in the middle of a stream and carved our initials along with a zillion other people's...
On that trip, we were maybe six weeks into our relationship. But we were both sure enough that it would last to leave an impression in the bark. And to grow out our hair.
 |
| save-the-date postcard (left), invitation (right), thank you cards (center front & back) |
The art deco style was important to our wedding because it was the style of the wedding ring that I'd found in antique store and given to Cindy when I proposed. Once we chose that style, everything else seemed to easily inform our other paper choices. The invitation design was actually inspired by one of our friends who attended and helped with the wedding. He came to a party we were having in our home once, and saw a photo of the two of us from when we'd first met. It was taken during our first getaway together, on a weekend trip to Wisconsin, where Cindy whisked me away to a bed and breakfast. It was one of those photos that you take with one hand while facing the camera, but we had given up trying to pose and managed to capture a kiss instead. He saw that photo and said that it would be the perfect Save-the Date for our wedding. I agreed, but thought it would be a better use as our invitation image. Cindy used her Illustrator skills to trace the image in that photo, and since we were going with the art deco style, we drew some long, luxurious hair onto our heads that would do dramatic things that our short hair never could have done in that photo.
 |
| inside of our invitations |
Cindy put a lot of energy and many hours of work into the website. She made it not only look gorgeous, and in the same motif as the paper items, but it was also incredibly functional for all our guests. There were links to the hotel, the restaurant, maps, and to RSVP online. She even created a form for our guests to help us build our wedding playlist, buy requesting any song they felt like listening to at the reception. My favorite feature, though, was our online gift registry. We used a website that allowed us to create a registry out of any gift that you could buy online. This was helpful to us because we didn't want to be stuck only having things from a single store (we have eclectic tastes) and because the one store we would have chosen didn't have a gift registry. We chose things we found all over the internet, and our guests could purchase exactly what we wanted and have them sent directly to our home, which was pretty great. We also gave our guests the option to simply give us money online, to help us pay for our Boston wedding, and to buy us Foodie Registry gift certificates, which helped launch us into our first year of eating fabulously well, and starting our very own blog about food (and obviously, other things.)
The website was designed to match our paper goods, and you can check out all the bells and whistles at this link, if you like. Here's a screenshot/sneak peak:
------
Update: Julia says I'm not finished writing this post because it's clear to everyone that I just said to hell with it and ended it without really, well, having an ending. So. Here goes.
 |
| the original photo |
 |
| finished invitation |
We were sooooooo in love (we still are, but not in that brand new relationship way) and we skipped town for just one night, drove way up into Wisconsin, and stayed at a lovely little B&B. On the way up, we stopped at a lakefront park for a picnic on the beach, and on the way back we hiked through another state park that was full of waterfalls. We climbed onto a giant log in the middle of a stream and carved our initials along with a zillion other people's...
On that trip, we were maybe six weeks into our relationship. But we were both sure enough that it would last to leave an impression in the bark. And to grow out our hair.
Wednesday, July 6, 2011
Pumpkin and Mocha and Berries, Oh My!
[Photos without a credit in this post were taken by Lindsay Pour, otherwise known as the most awesome best friend a person could have. Credited photos, as noted, are by Timmy Samuels/Starbelly Studios, who shot our wedding fantastically and for a ridiculously reasonable price.]
First up in our crafty wedding DIY madness posts is something we can all appreciate:* CAKE.
 You may think I am crazy for having made my own wedding cake, but I promise you I'm not. Well, I guess it's debatable, but given how much I like to bake and my history of making really yummy cakes and the price of cake when you buy them from a bakery (starting at $6/slice, really?!) compared to the price of me making it ($100ish, including the pans) it just made sense. And, as you know, we are practical people. (Also? Theatre people, and therefore, pretty much perpetually broke.)
Now, lest you think we dove into this baking adventure mere days before our wedding, I should remind you, we are stage managers. So we're good at planning and rehearsal. It so happened that about six months before our wedding I was putting together an opening night party for a production of Brecht's The Wedding. What's that? You think that sounds like a perfect event for a wedding cake test drive? Exactly. It worked out well, and even made us change our minds about which flavor deserved to be the largest tier.
The whole cake project took place the day before the wedding. With the help of my best friend Lindsay and my younger sister Jeanne, I baked a total of 8 layers for 3 tiers and I went through about a half a dozen eggs and I'm really not exaggerating when I say at least 4 pounds of butter. Seriously, Jeanne had to run to the store to buy more. It was in the name of perfecting the frosting, which was delicious.
While this was happening, Julia was finishing up some details on our dresses, Lindsay was stitching binding on my corset when she wasn't helping with the cake, and our friend Jay was sitting on our couch composing the little notes that he then attached to the white knots we asked our guests to wear. Busy day, that.
Midway through the baking and stacking process, I noticed that the layers for the top tier had risen significantly more than the bottom two tiers, and were going to make it at least an inch taller. I had a near-breakdown about the possibility of uneven tiers (because you CANNOT have uneven layers. It simply will not do.) After leaving the kitchen to go try not to cry about it, I ultimately decided to bake a third layer of the pumpkin and chocolate so that once it was all stacked up it would be uniform.
I know you want to drool over all the yumminess, so please allow me to describe the actual cake. (Possibly I am just really proud of myself and I want you to want to eat my cake.) The bottom tier was Pumpkin cake with Ginger Buttercream.

The middle tier was Devil's Food cake with Mocha Whipped Cream filling.

The top tier was vanilla-almond cake with berries and pastry cream inside.

The frosting covering the outside of the whole cake was my trial-and-error love child of French, Italian, and Swiss style buttercreams with some extra whipped cream added. I decorated it with what is known in the world of Wilton cake decorating magazines from the seventies as Cornelli lace. It's the little squiggles all over. It takes a LONG. TIME. to do. Then we put some fresh strawberries on top for a splash of color.
Nearly ten hours after starting, we packed up the cake in a box for the five block car trip to the restaurant where our reception would be.
I should note that when you make a layered cake like this, you're supposed to put a couple dowels through all the layers so that they don't go sliding about. I knew this, and had purchased said dowels. But once it was all stacked up, it seemed really sturdy... so I decided that I didn't really need to put them in. You know where this is going, right?
Yes, you do. We drove over, carried it into the restaurant's walk-in fridge, and as I turned to go, the manager asked if I was aware that my cake had fallen over.
I was not.
When I looked inside, I saw that the top two tiers had shifted and the entire cake was now squished up against one side of the box. Now at this point, we were already an hour late to go watch fireworks from a hotel rooftop with our families and the restaurant was about to close. So there was absolutely nothing I could do about it at that point.
Now you might think, given the fiasco of the uneven layers, that I was freaking out. But for reasons I do not understand - maybe because I'd been making cake all day, maybe because my wedding zen magically appeared, I don't know - I found this to be utterly hysterical. I laughed. Guffawed, even. And then I reached into the box, pushed those top tiers back where they belonged, and walked out the door with a plan to bring icing and tools to fix it in the morning.
It was a plan that totally would have worked. In fact, as the hours went by, I even made it better. How cool would it be, I thought, if instead of fixing it first thing in the morning, we waited until our walk over to the wedding, and stopped in on the way. Then, we could get awesome pictures of me fixing it while wearing my wedding dress!
But. When we got there, icing and apron in hand, I took one look at the cake and said, "Fuck it." I did not care one bit that the whole side was smashed. In fact, I still thought it was funny and I loved it. We discussed it very briefly and decided that, really, who would care anyway, as long as it still tasted amazing?
*Unless you're gluten-free, vegan, or lactose intolerant. Sorry. And for what it's worth, we had vegan, gluten-free cupcakes from The Bleeding Heart Bakery as an alternative for those folks.
First up in our crafty wedding DIY madness posts is something we can all appreciate:* CAKE.

Now, lest you think we dove into this baking adventure mere days before our wedding, I should remind you, we are stage managers. So we're good at planning and rehearsal. It so happened that about six months before our wedding I was putting together an opening night party for a production of Brecht's The Wedding. What's that? You think that sounds like a perfect event for a wedding cake test drive? Exactly. It worked out well, and even made us change our minds about which flavor deserved to be the largest tier.
The whole cake project took place the day before the wedding. With the help of my best friend Lindsay and my younger sister Jeanne, I baked a total of 8 layers for 3 tiers and I went through about a half a dozen eggs and I'm really not exaggerating when I say at least 4 pounds of butter. Seriously, Jeanne had to run to the store to buy more. It was in the name of perfecting the frosting, which was delicious.
While this was happening, Julia was finishing up some details on our dresses, Lindsay was stitching binding on my corset when she wasn't helping with the cake, and our friend Jay was sitting on our couch composing the little notes that he then attached to the white knots we asked our guests to wear. Busy day, that.
 |
| At times, I baked so fast the camera could not catch me. |
 |
| At other times, my baking frenzy was interrupted for dress fittings. And dancing. |
 |
| {How to attack a wedding cake.} |
 |
| Smooch Break! |

The middle tier was Devil's Food cake with Mocha Whipped Cream filling.

The top tier was vanilla-almond cake with berries and pastry cream inside.

The frosting covering the outside of the whole cake was my trial-and-error love child of French, Italian, and Swiss style buttercreams with some extra whipped cream added. I decorated it with what is known in the world of Wilton cake decorating magazines from the seventies as Cornelli lace. It's the little squiggles all over. It takes a LONG. TIME. to do. Then we put some fresh strawberries on top for a splash of color.
 |
| The first few squiggles. |
 |
| Two hours later, I am still making tiny squiggles, while Lindsay adds strawberries on top. |
 |
| Accoutrements of our wedding: cake, our rings, and a pile of white knots |
Yes, you do. We drove over, carried it into the restaurant's walk-in fridge, and as I turned to go, the manager asked if I was aware that my cake had fallen over.
I was not.
When I looked inside, I saw that the top two tiers had shifted and the entire cake was now squished up against one side of the box. Now at this point, we were already an hour late to go watch fireworks from a hotel rooftop with our families and the restaurant was about to close. So there was absolutely nothing I could do about it at that point.
Now you might think, given the fiasco of the uneven layers, that I was freaking out. But for reasons I do not understand - maybe because I'd been making cake all day, maybe because my wedding zen magically appeared, I don't know - I found this to be utterly hysterical. I laughed. Guffawed, even. And then I reached into the box, pushed those top tiers back where they belonged, and walked out the door with a plan to bring icing and tools to fix it in the morning.
It was a plan that totally would have worked. In fact, as the hours went by, I even made it better. How cool would it be, I thought, if instead of fixing it first thing in the morning, we waited until our walk over to the wedding, and stopped in on the way. Then, we could get awesome pictures of me fixing it while wearing my wedding dress!
But. When we got there, icing and apron in hand, I took one look at the cake and said, "Fuck it." I did not care one bit that the whole side was smashed. In fact, I still thought it was funny and I loved it. We discussed it very briefly and decided that, really, who would care anyway, as long as it still tasted amazing?
 |
| Our beautiful, delicious, fabulously smooshed wedding cake! |
 |
| And I couldn't resist adding this picture because I love it so much! |
*Unless you're gluten-free, vegan, or lactose intolerant. Sorry. And for what it's worth, we had vegan, gluten-free cupcakes from The Bleeding Heart Bakery as an alternative for those folks.
Monday, July 19, 2010
here come the brides
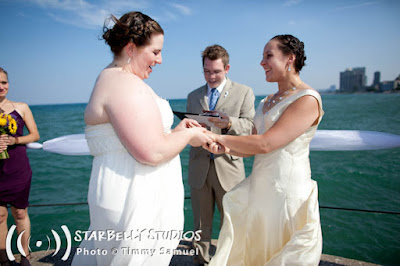
First, we got married. In Chicago. [July 5, 2010]
And held our simple, but lovely reception at RoPa Restaurant, where they served our guests a 3-course family-style meal, with plenty of wine to share...

Fried Calamari, RoPa Salad, Chicken "Chops" with roasted potatoes, Baked Tilapia with roasted tomatoes and seasonal vegetables, Penne with artichokes, olives, and feta in a creamy tomato sauce
...and where we also ate this magnificent cake (made and accidentally squished by Cindy)


Top tier: vanilla almond cake with fresh summer berries and pastry cream
Middle tier: devil's food cake with dark chocolate-espresso whipped cream
Bottom tier: pumpkin cake with ginger buttercream
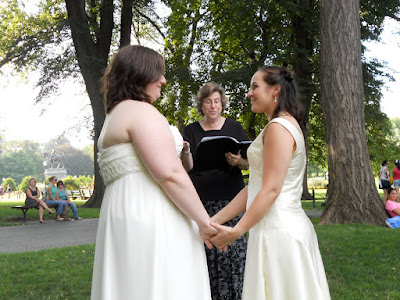
Then we got married again. Legally. In Boston. [July 19, 2010]
Naturally, we ate again!
This time, we chose to splurge on a little French restaurant, Bistro du Midi, where for the first time we ate somewhere where professional chefs and true "foodies" would love the food just as much as we did. We started out with a bottle of champagne (compliments of the restaurant - we did just get married, after all!), then had some appetizers of mussels, foie gras, and salad. After much deliberation on the choice of wine, we were finally on to our main courses...

Seared Duck Breast, Swiss Chard, Gnocchi, Black Olives

Grilled Rack of Lamb, Panisse Croquette, Green Olives and Fava Beans

And our friend Rosita had a Ribeye special with Cremini, Chantarelle, and Portobello Mushrooms
...and also some desserts, which we scarfed down so fast we completely failed to photograph them. Cindy had Rhubarb Rose Crumble with Vanilla Bean Ice Cream, and Julia had a Lemon Tart with Fresh Berries and Basil Ice Cream. Both were amazing. (Hence, the lack of pictures due to complete focus on eating.)
But this blog is just as much about our cooking adventures as our eating-out adventures. In fact, so far this year we have eaten out more rarely than ever before, since our tastes have made us much more discriminating. Plus, we love to cook, and have become pretty good at it, too.
So now that our wedding and mini-honeymoon are over, there are daily occasions to cook and eat great food.
And so begins our journey.
Subscribe to:
Posts (Atom)